You planted everything right. You waited for the soil to warm, hardened off the transplants, tucked them into amended beds on a promising April afternoon. A week later, half the row is dead. Stems collapsed at the soil line, a few cut clean off at the base, something chewed the lettuce to ribbons overnight. Three different problems, three different causes, three completely different fixes. If you treat them all the same way, you waste time and money on the two you guessed wrong.
In the Puget Sound lowlands, the first threat to spring vegetables is not frost and it is not insects. It is the soil itself: cold, wet, and full of fungi that kill seedlings before they clear the surface. Understanding what is actually happening to your transplants in the first eight weeks after planting is worth more than any spray schedule.
What Is Actually Killing Your Seedlings
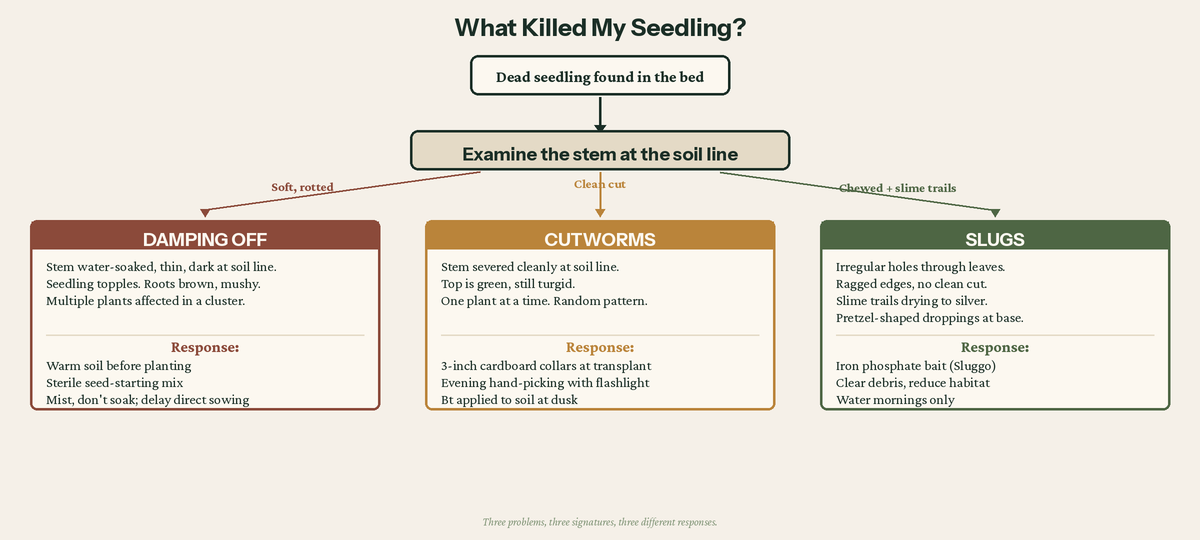
A dead seedling on a spring morning tells you almost nothing by itself. You need to read the stem, the soil surface, and the surrounding plants before you reach for a product. Three problems dominate the early-season vegetable garden here, and each leaves a different signature.
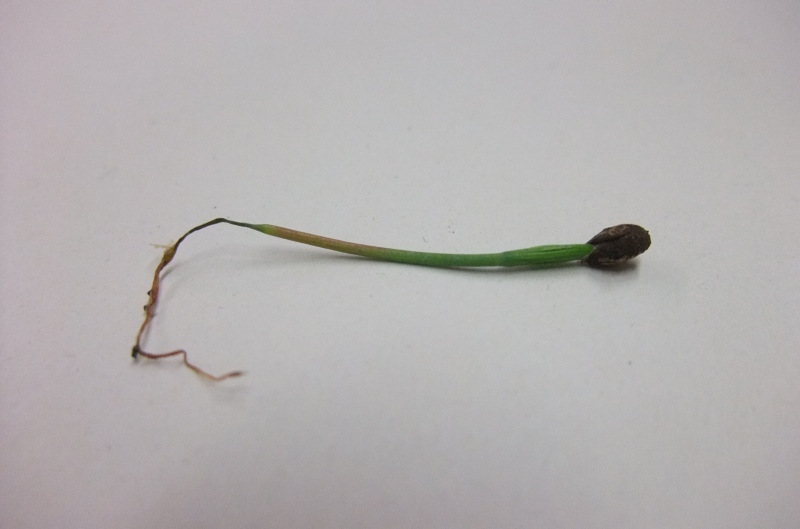
Damping off. The stem at the soil line looks water-soaked, thin, and dark. The seedling topples or wilts without being cut. Pull it and the base of the stem is soft, sometimes thread-thin where it meets the soil. The roots may look brown and mushy. There is no clean break, no chewing damage, no slime. If multiple seedlings in the same row collapse within a few days of each other, damping off is almost certain. It moves through the soil and hits clusters, not individuals.
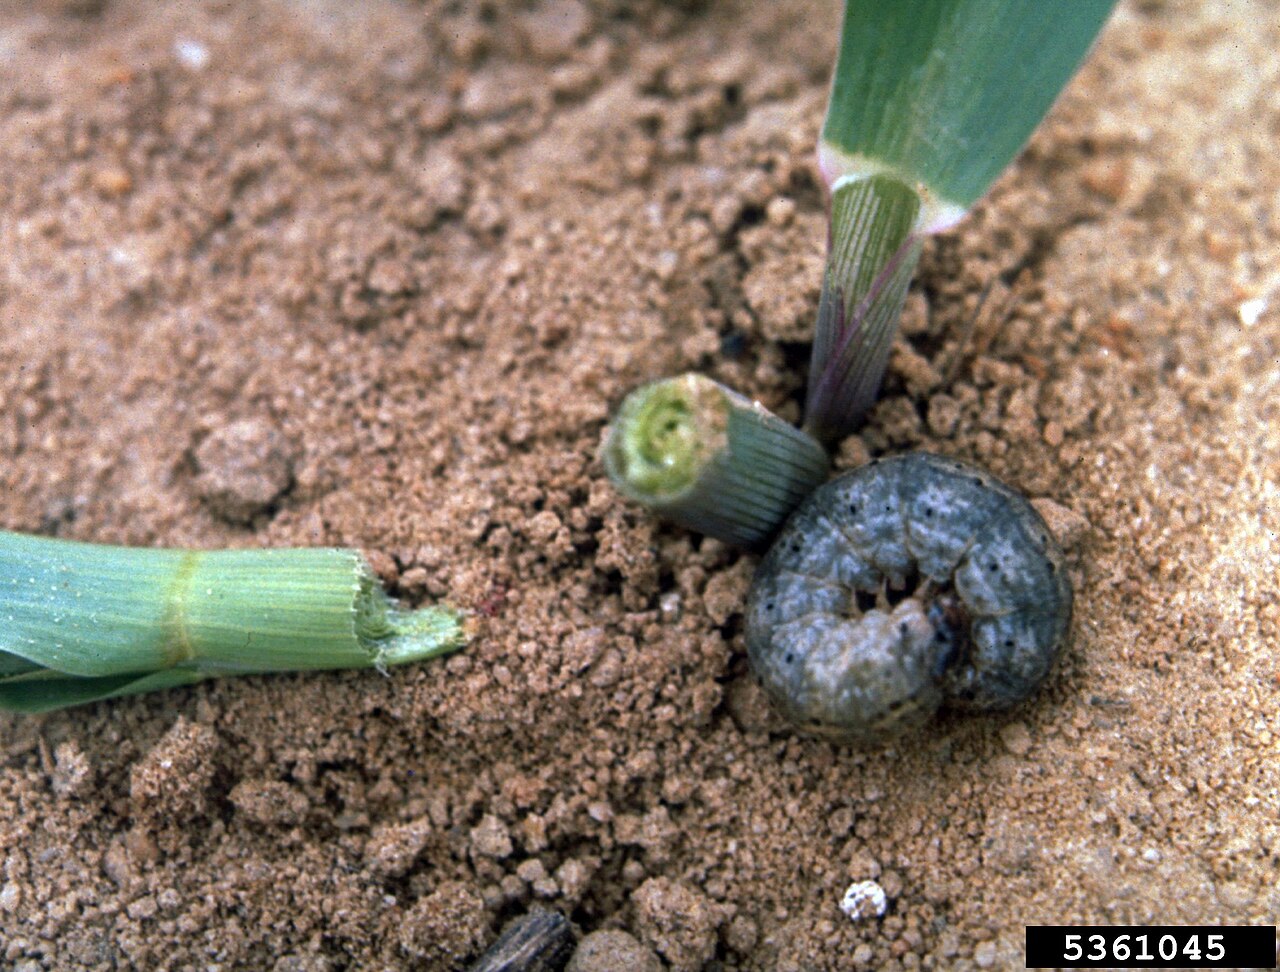
Cutworms. The stem is severed cleanly at or just below the soil line, as if someone took scissors to it. The top of the plant lies on the ground, still green, still turgid. The cut end is smooth, not rotten. Scratch the soil within two inches of the severed stem and you will often find the culprit: a gray-brown caterpillar curled into a tight C-shape, hiding just below the surface. Cutworms work alone. One larva, one cut seedling per night. The damage is random across the bed, not clustered.
Slugs. Irregular holes through leaves, ragged edges, no clean cuts. Slime trails on the soil surface dry to silver in the first hour of morning sun. Pretzel-shaped droppings at the base of damaged plants. Unlike cutworms, slugs rarely sever stems. They eat tissue, leaving behind tattered, translucent remnants of what was a leaf. The damage is worst on lettuce, brassica seedlings, and anything with soft, low foliage.
Start with damping off. In this region, it is the most likely explanation for dead seedlings before mid-May.
Damping Off: The Default Outcome of Early Planting
Damping off is not a single disease. It is a complex of soilborne fungi, primarily Pythium, Rhizoctonia, and Fusarium, that attack seeds and seedlings in cool, wet soil. These organisms are always present. Every garden bed in the Puget Sound lowlands harbors them. The question is not whether the pathogens are there but whether conditions favor them over the seedling.
Between 2020 and 2025, 62 percent of spring days across the weather network met both conditions that favor damping off: soil temperature below 60°F and measurable precipitation. In the wettest spring on record (2022), that number climbed to 84 percent. This is not a disease you sometimes get unlucky with. In the Puget Sound lowlands, damping off is the default outcome of direct-seeding into cold spring soil. You can check current soil temperatures and station comparisons across the region at our weather dashboard.
The mechanism is simple: seeds germinate slowly in cold soil. Fungi grow faster than the seedling can push through the surface. A bean seed in 55°F soil takes 14 to 18 days to emerge. In 70°F soil, the same seed is up in 6 to 8 days. Every extra day underground is another day the fungi have access to a defenseless root.
There is no rescue once damping off starts. No fungicide reverses a collapsed stem. The entire strategy is prevention, and every tool works the same way: shorten the time the seed spends underground so it emerges before the fungi can colonize it.
Soil temperature is the lever you can actually pull. Raised beds drain faster and warm earlier than in-ground rows. Black plastic mulch for two to three weeks before planting raises soil temperature 5 to 10 degrees. If you are direct-seeding beans, squash, or corn, wait until the soil reaches 60°F at 4-inch depth. Our spring planting guide covers the thresholds for each crop.
Clean seed-starting mix eliminates the pathogen reservoir. For transplant-started crops, fresh commercial mix is sterile. Do not reuse last year’s mix or add garden soil. UC Davis research found that composted hardwood bark suppresses damping off better than peat because it supports beneficial Trichoderma fungi that compete with Pythium around the germinating seed.
Mist, do not soak, and plant shallowly. Overwatering creates the saturated conditions Pythium requires. Let the top quarter-inch dry between waterings. Plant at the shallowest recommended depth; a seed buried half an inch emerges days faster than one buried an inch, and every day matters.
Biological seed treatments for high-value direct seeding. Trichoderma harzianum seed coatings produced 66 percent plant stand versus 40 percent untreated in a peer-reviewed trial. Worth the cost for market growers direct-seeding into cool soil; overkill for a home gardener starting transplants in clean mix.
Cutworms: The Night Shift
If you find a transplant severed cleanly at the soil line and the stem base shows no rot, you have cutworms. Several species of moth larvae (family Noctuidae) overwinter in the soil or emerge from eggs laid the previous fall, and they begin feeding as soon as nights warm above freezing. In this region, that means late March onward, with peak damage in April and May.
How many you have depends partly on what grew in that bed last fall. Cutworm moths prefer to lay eggs in weedy or grassy ground. Beds left weedy through September harbor more overwintering larvae than beds that were clean-cultivated or tarped after the last harvest. If cutworms hit you hard this spring, manage those beds differently next fall.
Cutworms feed at night and hide during the day. If you only look during daylight, you will never see one. Go out with a flashlight two hours after dark and scratch the soil at the base of any cut plant. The larva will be within a few inches, curled into a C.
Collars work because cutworms crawl along the soil surface to find stems. A 3-inch ring from a cardboard tube or bottomless plastic cup, pushed 1 inch into the soil with 2 inches above, creates a vertical barrier they cannot grip. Costs nothing, works for every transplant.
Hand-picking is effective because each larva operates alone in a small territory. A 15-minute nightly patrol with a flashlight and soapy water during April and May eliminates most of the local population.
Clean cultivation removes daytime shelter. Clear debris, weeds, and thick mulch within a few inches of transplants to force larvae into open soil where birds and ground beetles find them.
Bt for heavier infestations. Bacillus thuringiensis var. kurstaki (Btk) applied to the soil surface at dusk targets feeding larvae. It must be ingested, so apply in the evening. Spinosad is an OMRI-certified alternative. For persistent pressure across many beds, beneficial nematodes (Steinernema carpocapsae) applied to warm, moist soil reduce larval populations before transplanting.
Slugs: Year-Round Residents

If you moved to the Puget Sound region from anywhere with real winters, adjust your slug expectations. Slugs here do not emerge in spring, build up in summer, and crash in fall. They are active whenever overnight temperatures exceed 38°F and the surface is wet. That describes most nights from October through May.
Our spring slug and snail management guide covers slug biology and long-term management in depth. What matters for the vegetable garden specifically:
Iron phosphate bait works. OSU Extension research confirms iron phosphate (Sluggo and similar products) matches metaldehyde for slug mortality, with two advantages: it is pet-safe, and a Scientific Reports study showed it persists through rain while metaldehyde degrades. In a region where it rains on your slug bait six days out of seven in April, that persistence matters. Apply around newly planted beds at label rates. Reapply after heavy rain.
Reduce habitat. Boards, ground-level debris, dense ground covers adjacent to vegetable beds, and weedy margins all shelter slugs during the day. Clear a 12-inch bare-soil buffer around beds. Water in the morning so the surface dries by evening. In the months where rain makes irrigation timing moot, focus on drainage and habitat reduction instead.
Copper tape on raised beds. A 2-inch copper strip along the top edge of a raised bed creates a barrier slugs avoid. It is not foolproof, but it reduces nighttime incursions measurably, especially on isolated beds without overhanging foliage that lets slugs bypass the barrier.
Transplant sturdy starts. A 4-inch-tall transplant with a woody stem base survives slug grazing better than a direct-seeded seedling with cotyledons at ground level. In slug-heavy beds, transplanting is a damage reduction strategy in itself.
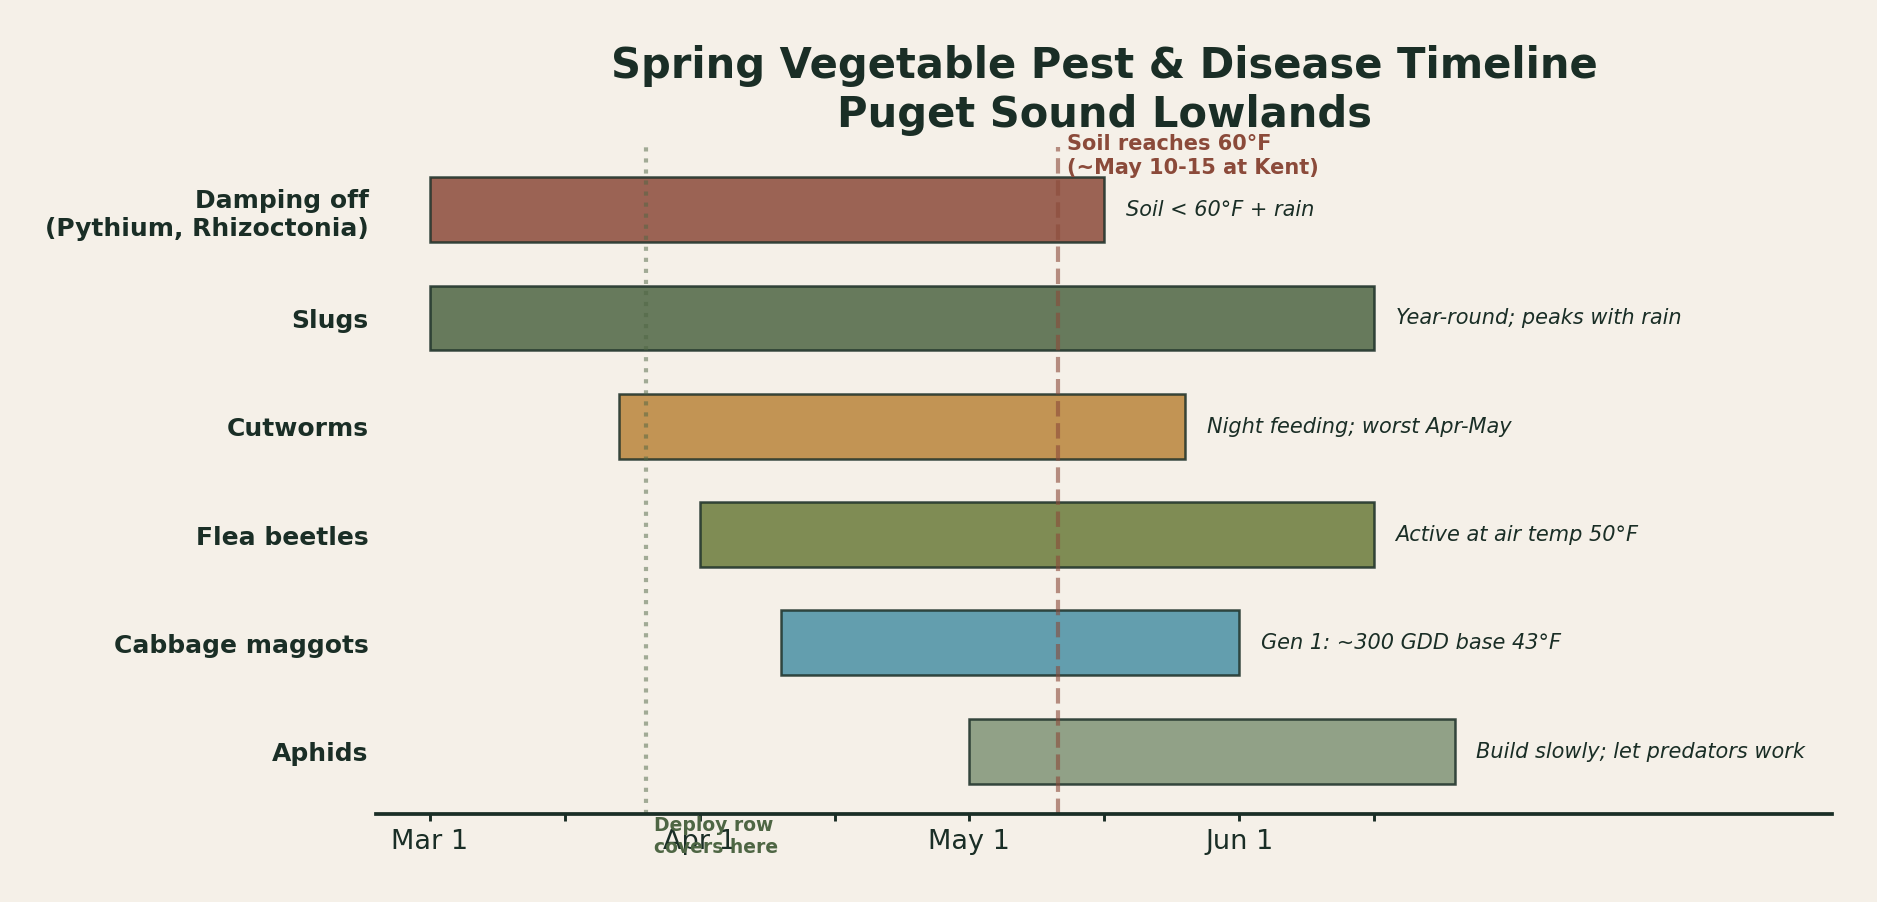
The Supporting Cast: Flea Beetles, Cabbage Maggots, and Aphids
The first three threats are what you face in March and April. From late April through June, a second wave of pests builds as temperatures climb and the first generation of flying insects emerges.
Flea Beetles
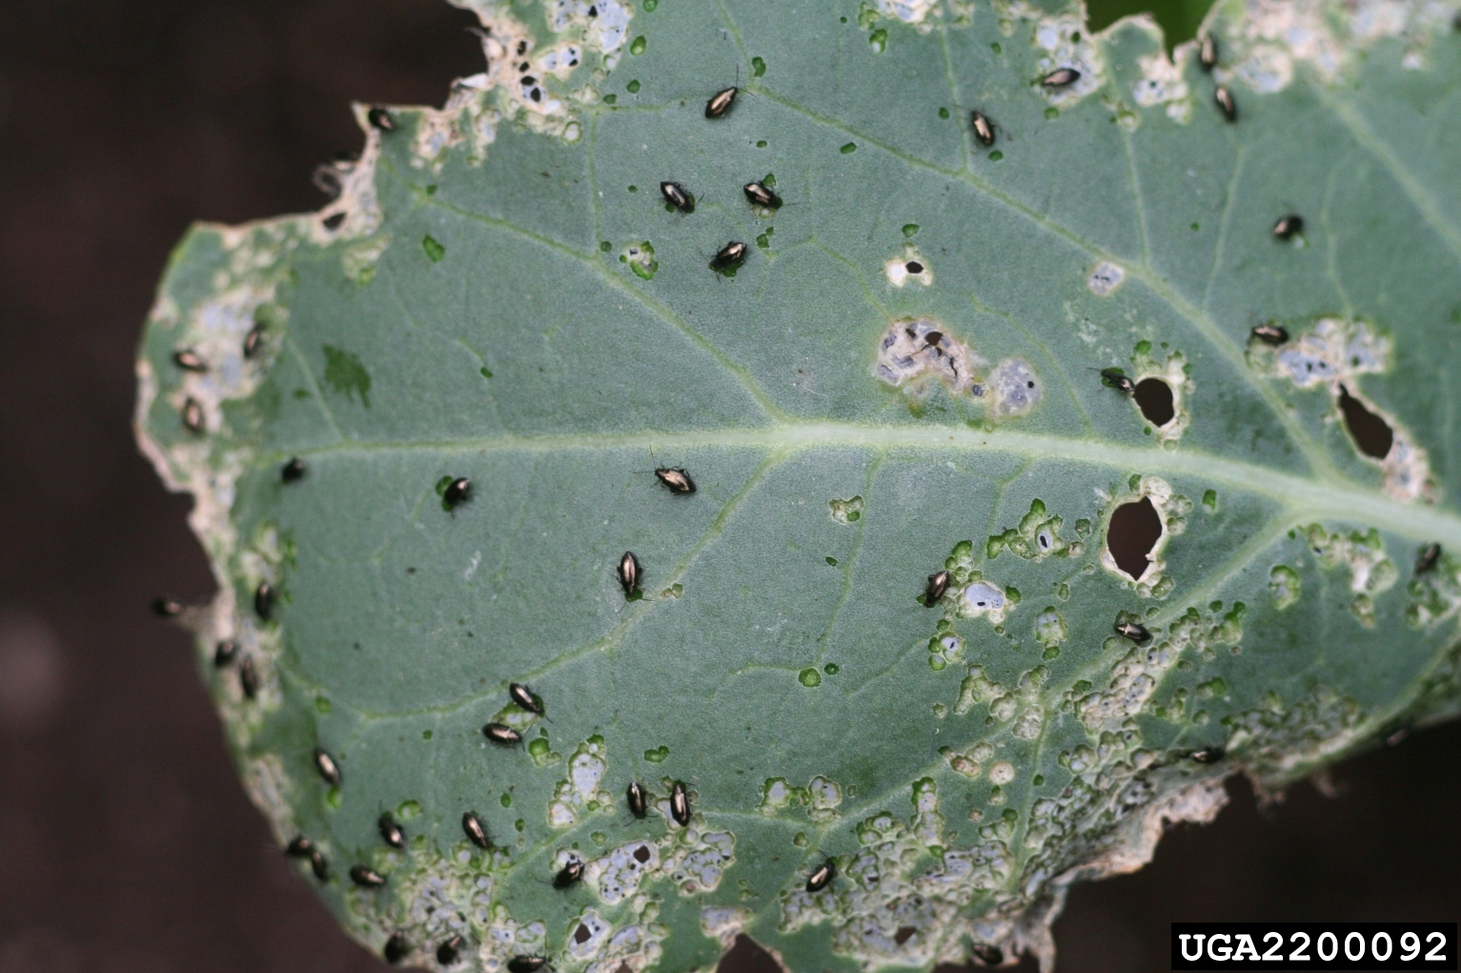
Tiny metallic-black beetles, 1 to 2 mm, that jump when disturbed. They chew small round holes through leaves, giving brassica seedlings a characteristic shot-hole pattern. Flea beetles become active in April when air temperatures consistently reach 50°F, and egg-laying begins in May. Young brassicas, radishes, and turnips take the worst damage. Established plants with several true leaves outgrow the feeding, which is the key to managing them without chemicals: the race is between leaf area and beetle appetite.
Scout every one to two days on vulnerable crops. If you see the shot-hole pattern on young transplants, check for the beetles themselves by approaching the plant slowly and watching for movement. Row covers deployed at planting (see the next section) provide 100 percent exclusion. If you are not using row covers, transplanting rather than direct-seeding gives brassicas a head start that often makes the difference. A transplant with four true leaves tolerates flea beetle feeding. A cotyledon-stage seedling does not. Some growers plant a row of radishes as a trap crop alongside their main brassicas; flea beetles preferentially feed on the radishes, reducing pressure on the crop you actually want. Pull and discard the radishes once the main crop is established.
Cabbage Maggots
The larva of a small fly (Delia radicum) that lays eggs at the base of brassica stems. The maggots bore into roots, causing wilting and plant death. A 2021 OSU survey of PNW vegetable farms found 100 percent incidence of cabbage maggot and 44 percent of growers reporting yield losses between 10 and 25 percent. It is the most economically significant pest of spring brassicas here.
First-generation adult flies emerge at approximately 300 GDD base 43°F. At Kent, that typically falls in late April to early May. Row covers deployed at seeding or transplanting, before the flies are active, are the most effective control. Crop rotation matters: do not plant brassicas in the same bed that grew brassicas last year. The pupae overwinter in the soil and the adults emerge where they grew up.
Aphids
Aphid colonies build slowly through the maritime spring, rarely reaching damaging levels before late May. Green peach aphid and cabbage aphid are the main species on spring vegetables. The most effective early-season management is patience, because aphid populations are almost always followed, within two to three weeks, by the predators that depend on them: ladybird beetles, syrphid fly larvae, lacewings, and parasitic wasps. Spraying a broad-spectrum insecticide kills the predators too, and aphids rebound faster because their generation time is days while predator populations take weeks to rebuild. The result is worse pressure in June than you would have had by doing nothing in April.
Look for signs the natural system is working: tiny orange syrphid eggs near aphid colonies, brown papery “mummies” where parasitic wasps have colonized, and ladybird larvae (small black alligators, not the familiar adults). If these are present, the problem is solving itself. If colonies curl leaves or coat plants with honeydew and no predators are visible, insecticidal soap provides knockdown without harming beneficials.
Cabbage Looper and Imported Cabbageworm
White butterflies (imported cabbageworm) and brown-mottled moths (cabbage looper) lay eggs on brassica leaves starting in April. The green caterpillars chew ragged holes through leaves and leave dark frass pellets. Row covers exclude the adults from laying eggs entirely. If caterpillars are already present, Btk applied to foliage is the targeted biological control. Hand-picking is effective on small plantings.
The One Tool That Solves Half the List: Row Covers
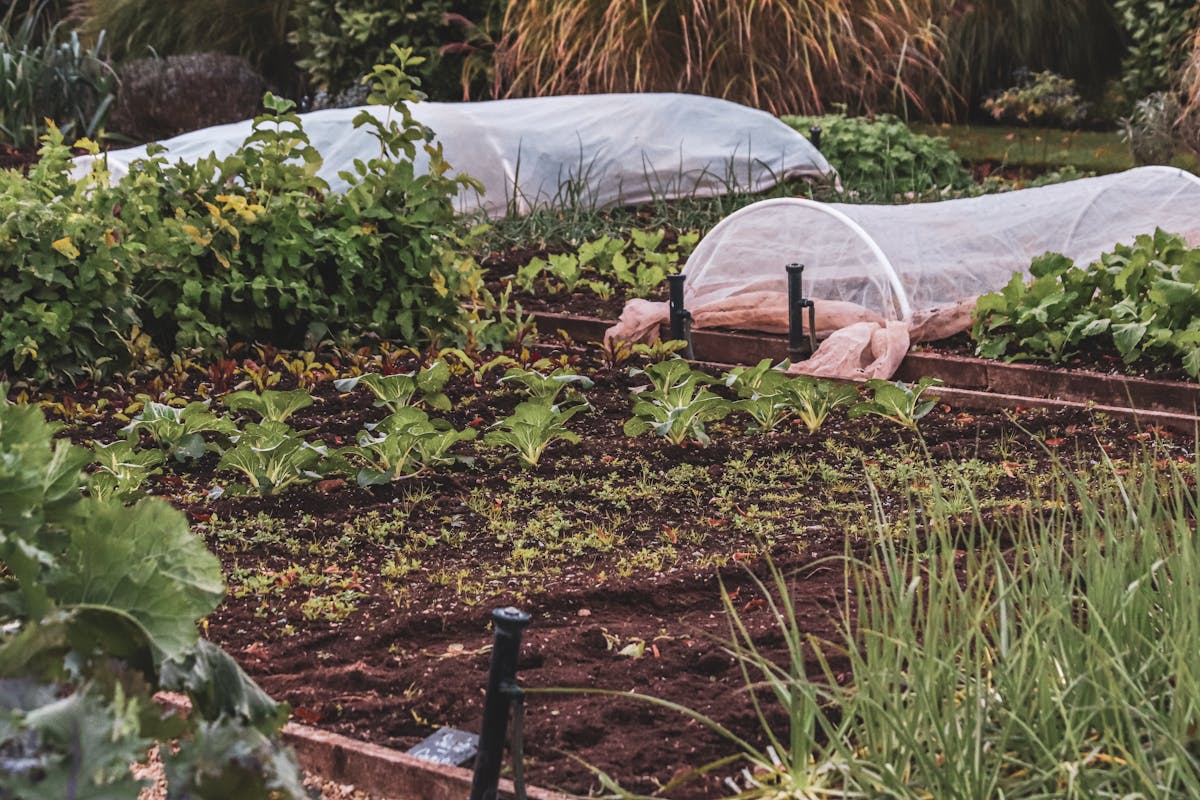
Floating row covers are lightweight spunbond fabric (sold as Remay, Agribon AG-19, or generic equivalents) draped directly over crops or supported on wire hoops. They let in light, air, and water while excluding flying insects. A single investment in row cover fabric addresses flea beetles, cabbage maggots, cabbage loopers, imported cabbageworms, and reduces aphid pressure. No other single tool has that range.
Deploy at planting, not after damage appears. If the pest is already inside, the cover traps it with the crop. Cover brassica beds the day you transplant or direct-seed, before the first cabbage maggot fly or flea beetle arrives.
Anchor the edges completely. Sandbags, landscape staples, or buried edges. The most common failure mode is loose edges that let insects crawl underneath.
Remove for pollinator-dependent crops at flowering. Tomatoes, peppers, cucumbers, squash, and beans need pollinator access; cover them through the seedling stage, then remove at bloom. Brassicas do not need pollination to produce the harvest, so covers can stay on all season.
Choose the right weight. Lightweight covers (AG-19, 0.55 oz/yd²) provide pest exclusion with 2 to 4 degrees of frost protection. Heavier covers (AG-50, 1.5 oz/yd²) add 6 to 8 degrees of frost protection but reduce light 15 to 20 percent. For pest exclusion here, lightweight is usually right.
What row covers do not solve. Damping off is a soil problem; covering wet beds traps moisture and can worsen it. Slugs enter at ground level. Cutworms are already in the soil when you plant.
Seasonal Action Summary
| When | What | Why |
|---|---|---|
| March | Start seeds indoors in fresh sterile mix. Warm outdoor beds with black plastic mulch. | Avoid damping off. Build soil temperature ahead of transplanting. |
| Late March | Install 3-inch cardboard collars at transplant. Deploy row covers over brassica beds. | Cutworm feeding begins. Get exclusion barriers in place before cabbage maggot emergence. |
| April | Apply iron phosphate slug bait around newly planted beds. Water mornings only when irrigation is needed. | Slug pressure peaks with spring rain. Morning watering lets the surface dry before slugs are active. |
| Late April | Scout brassica seedlings every 1 to 2 days for flea beetle shot-hole damage. Maintain row covers. | Flea beetle activity peaks. Row covers are your primary defense. |
| May | Monitor for aphid colonies. Do not spray broad-spectrum insecticides. | Aphid populations are building, but so are their predators. Let the natural enemies work. |
| Mid-May onward | Direct seeding into open soil is safer once soil crosses 60°F. Damping off risk drops meaningfully. | Kent soil typically reaches 60°F by May 10 to 15. |
Sources
- WSU HortSense: Vegetable Pest and Disease Fact Sheets — Management recommendations for damping off, cutworms, flea beetles, slugs, cabbage maggots, and aphids on PNW vegetables.
- [UC Davis IPM: Damping-Off Diseases in the Garden](https://ipm.ucanr.edu/home-and-landscape/damping-off-diseases-in-the-garden/) — Sanitation protocols, composted bark suppression data.
- UMN Extension: Prevent Seedling Damping Off — Sterile mix, misting vs. watering, warm soil as defense.
- OSU Extension: Iron Phosphate Slug Bait Effectiveness — Iron phosphate parity with metaldehyde; persistence in wet conditions.
- Rae et al. 2019, Scientific Reports: Slug Bait Efficacy — Iron phosphate unaffected by watering frequency; mini-pellet formulations outperform in rain.
- Cornell NEWA: Cabbage Maggot Degree-Day Model — First-generation emergence at 300 GDD base 43°F.
- OSU Extension: Cabbage Maggot Solutions — 2021 survey data: 100% incidence, 44% yield loss without controls.
- Wisconsin VegEnto: Flea Beetles on Vegetables — Scouting protocol, egg-laying timing, row cover efficacy.
Pesticide label disclaimer: Always read and follow the product label. Product availability and registration status vary by state and change over time. Mention of a trade name does not constitute endorsement.